Attack surface & identity
Investigate an attack path
Analyze Secorvia’s security graph, read ranked attack paths, and investigate entry points, privilege escalation, and target assets.
Reviewed
Before you start
Build a security graph from collected inventory. The interactive canvas requires a desktop-sized display; smaller screens show ranked paths.
Open Attack Path and check the graph
Select Attack Path under Attack Surface. If no graph exists, return to Graph Explorer and build one. Check snapshot freshness before interpreting routes through newly added or changed infrastructure.
- Attack Path navigation
Open the ranked paths under Attack Surface. This older recording labels the item Attack Paths.
- Graph Explorer navigation
Return to the graph if it needs to be built or refreshed. The recording uses the earlier Security Graph label.
These highlights show navigation only. Graph build controls and snapshot freshness are not visible in this capture.
Product recording: ranked attack paths, with resource names removed. The current navigation label is Attack Path.
Run an analysis
Choose Analyze to run against the current security graph. Wait for results before reviewing the path list. The app may report that no analysis has run yet; this differs from an analysis that found no paths.

- Run analysis / Analyze
Start the analysis against the current graph, then wait for results. The current interface calls this action Analyze.
Product recording: Run analysis is the earlier label for the current Analyze action.
Read a ranked path
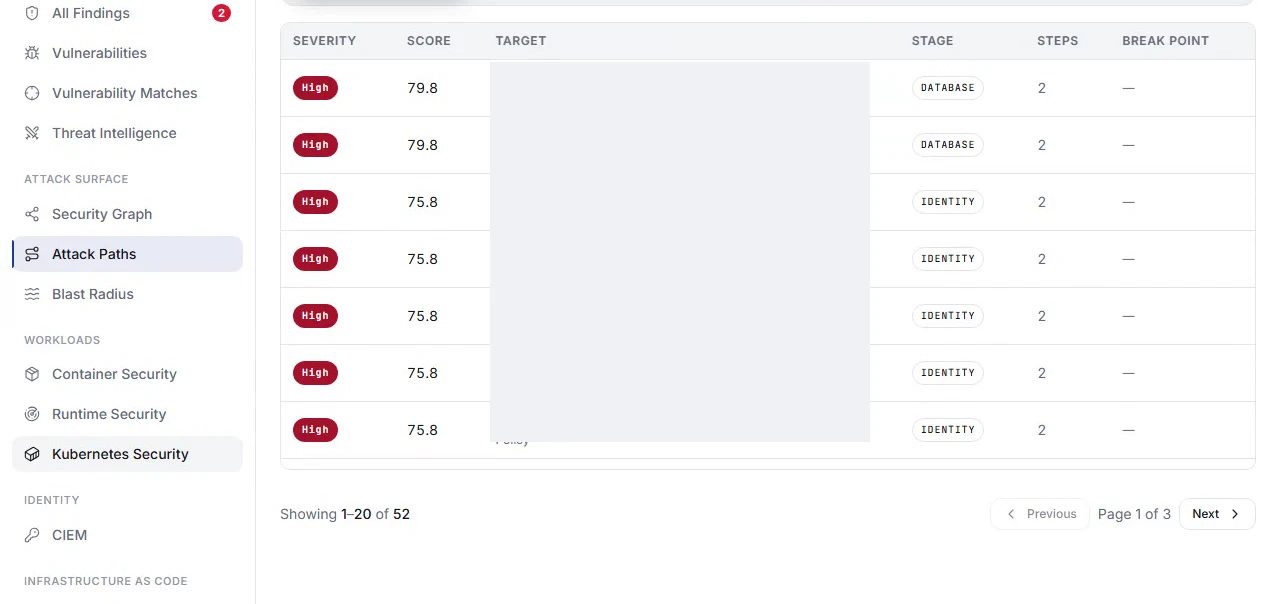
Review severity, score, target, stage, steps, and any breakpoint shown. Follow the path from initial entry point through privilege escalation or lateral movement toward a high-value asset and business impact. A path models possible reachability; it is not evidence that an attack happened.
- Severity and score
Use severity together with the path score when deciding which modeled route to investigate first.
- Target
Identify the destination resource in your own workspace. Target names are redacted in this example.
- Stage
Read the stage alongside the target and path context; DATABASE and IDENTITY appear in this recorded list.
- Steps
Read the number of steps in the modeled route. This is not a count of observed attacks.
- Break point
Inspect a breakpoint when one is shown. A dash in this example is not evidence that a mitigation has been applied.
The ranked list is shown here. Resource details and the interactive path canvas require separate captures.
Product recording: ranked attack paths, with resource names removed. The current navigation label is Attack Path.
Inspect the resource context
Select a resource and review Provider, Region, Account, findings, vulnerabilities, and relationships. Where present, read CVSS, EPSS, and KEV alongside the graph context. Use Blast Radius to understand what is reachable from a particular resource.
Verify a change against a fresh graph
Coordinate a fix with the owning team, refresh affected inventory, rebuild the graph, and analyze again. Use the new result to check whether the relationship or exposure changed.
Where you are now
You can explain a modeled route, its supporting resource evidence, and how to verify a change to that route.
WHEN SOMETHING LOOKS OFF
A few things to check
No analysis has been run
Choose Analyze after the graph is built.
The graph needs a larger screen
Use the ranked list on mobile and open the same page on desktop for the canvas.
PUT IT INTO PRACTICE
Make your next move in Secorvia.
Open the app and follow along with your own organization.